
The post How to download Microsoft Visio 2024 appeared first on free product key.
]]>How to download Microsoft Visio 2024
- To download Microsoft Visio Pro 2024 you click here
- To download Microsoft Visio Standard 2024 you click here

How to install Visio Pro 2024
Step 1: You open the file you download
Step 2: You click setup.exe file
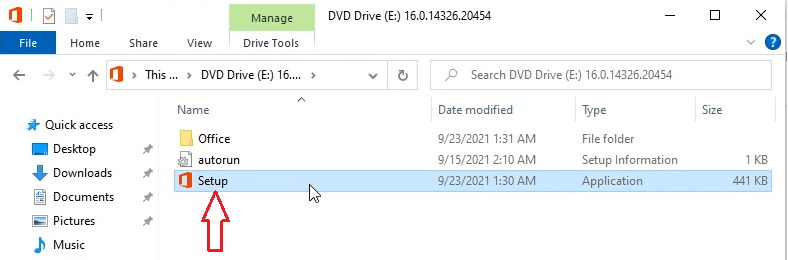
Step 3: You wait for a moment to install Visio Professional 2024
After you install Visio Pro 2024, you have 5 days to use it.
You can buy Visio Pro 2024 product key for $80/key (lifetime) to activate it here: https://getproductkey.net/visio2024
Visio Professional 2024 features
 Ready-made templates & shapes for flowcharts, org charts, network diagrams, and more.
 Data linking with Excel, SQL Server, and SharePoint for live, data-driven diagrams.
 Collaboration tools — co-authoring, comments, and sharing via OneDrive/SharePoint.
 Support for industry standards (UML 2.5, BPMN 2.0).
 AutoCAD (DWG) import/export for engineering drawings.
 New 2024 UI & themes for a modern, accessible Office-style look.
 Expanded stencils & templates (Azure, Kubernetes, UML, etc.).
 Improved search bar and smoother integration with other Office 2024 apps.
10 frequently asked questions (FAQs) about Microsoft Visio 2024 Professional
1. What is Visio 2024 Professional used for?
Visio 2024 Professional is a diagramming tool used to create flowcharts, org charts, network diagrams, floor plans, and process maps — ideal for business, engineering, and IT design.
2. What’s new in Visio 2024 Professional compared to older versions?
It includes a refreshed Office 2024-style interface, improved accessibility, enhanced search, new Azure and Kubernetes stencils, and updated templates for UML 2.5 and BPMN 2.0.
3. Does Visio 2024 Professional support real-time collaboration?
Yes. You can co-author, comment, and share diagrams through OneDrive or SharePoint for real-time collaboration.
4. Can I link Visio diagrams to live data?
Yes. You can connect diagrams to data from Excel, SQL Server, or SharePoint lists so visuals update automatically when data changes.
5. What’s the difference between Visio 2024 Professional and Visio Standard 2024?
The Professional edition includes advanced templates, additional shapes (e.g., IT and engineering stencils), and data-linking features not available in the Standard edition.
6. Can I import AutoCAD drawings into Visio 2024 Professional?
Yes. It supports DWG and DXF file import/export for working with CAD-based designs.
7. Is Visio 2024 Professional part of Microsoft 365?
No. It’s a standalone desktop application, but it integrates seamlessly with Microsoft 365 apps like Excel, Teams, and SharePoint.
8. What are the system requirements?
You’ll need Windows 10 or 11, at least 4 GB RAM (8 GB recommended), and around 4 GB of free disk space.
9. Can Visio 2024 Professional open files from older Visio versions?
Yes. It can open and edit diagrams created in older versions (e.g., Visio 2016, 2019, 2021).
10. Does Visio 2024 Professional have a subscription option?
No, it’s a one-time purchase. However, if you prefer a cloud-based version with continuous updates, you can use Visio Plan 2 (Microsoft 365).
The post How to download Microsoft Visio 2024 appeared first on free product key.
]]>The post How to Add a Checkbox in Excel (Step-by-Step Guide) appeared first on free product key.
]]>In this guide, you’ll learn how to add a checkbox in Excel — step by step — along with a few tips to make them work perfectly.
What Is a Checkbox in Excel?
A checkbox in Excel is a small square box that can be checked ( ) or unchecked (☐). It’s an interactive form control that links to a cell and returns either TRUE (if checked) or FALSE (if unchecked).
Checkboxes are especially useful in:
- Task or to-do lists
- Progress trackers
- Forms and surveys
- Dashboards with interactive filtering
How to Add a Checkbox in Excel (Step-by-Step)
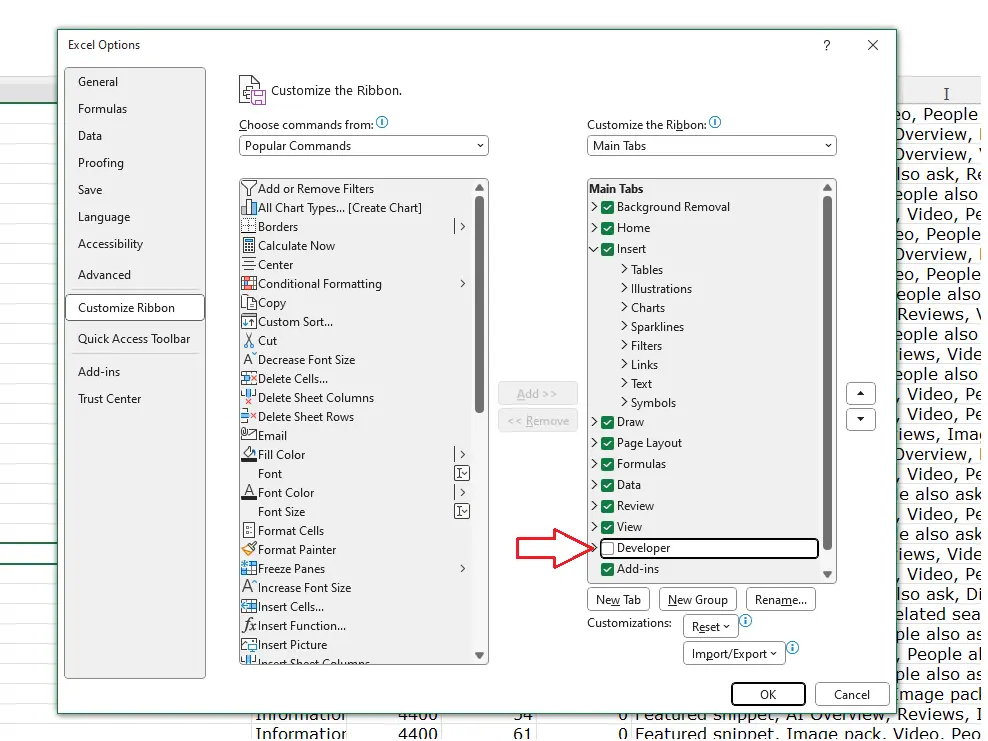
Step 1: Enable the Developer Tab
By default, the Developer tab (where checkboxes live) is hidden in Excel. Here’s how to enable it:
- Go to the File tab → select Options.
- In the Excel Options window, choose Customize Ribbon.
- On the right side, check the box next to Developer.
- Click OK.
You’ll now see a new Developer tab on the Excel ribbon.
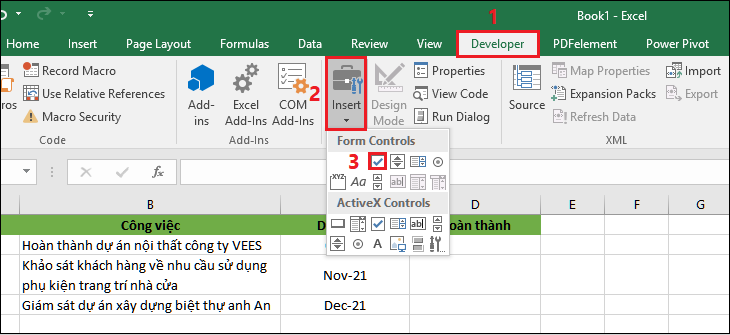
Step 2: Insert a Checkbox
- Click the Developer tab.
- In the Controls group, click Insert.
- Under Form Controls, click the Checkbox (
 ) icon.
 - Click anywhere on the worksheet where you want to place the checkbox.
You’ve just added your first checkbox!
Step 3: Format or Rename the Checkbox
By default, Excel labels the checkbox as “Check Box 1”. To rename or remove this label:
- Right-click the checkbox and choose Edit Text.
- Type a new label (e.g., “Task Completed”) or delete the text if you want only the box.
You can also move or resize the checkbox by dragging its edges.
Step 4: Link the Checkbox to a Cell
To make your checkbox functional (so Excel knows whether it’s checked or not):
- Right-click the checkbox and select Format Control.
- In the Control tab, find the Cell link box.
- Click inside it, then click on the cell where you want the checkbox’s value to appear (for example, B2).
- Click OK.
Now, when you check or uncheck the box, the linked cell will show TRUE or FALSE.
 Bonus Tips: How to Use Checkboxes Effectively
1. Create a To-Do List
You can use checkboxes to mark completed tasks.
Example formula:
=IF(B2=TRUE, "Done", "Pending")
2. Apply Conditional Formatting
Highlight tasks automatically when checked:
- Select your task range.
- Go to Home → Conditional Formatting → New Rule → Use a formula.
- Enter:
=$B2=TRUE
4. Set a formatting style (like strikethrough or green fill).
3. Copy Checkboxes Quickly
To add multiple checkboxes:
- Select the existing checkbox.
- Hover over its lower-right corner until the cursor becomes a small cross.
- Drag it down to duplicate across rows.
 Troubleshooting Common Issues
| Problem | Solution |
|---|---|
| Can’t find Developer tab | Make sure it’s enabled under File → Options → Customize Ribbon. |
| Checkbox doesn’t move with cell | Right-click → Format Control → Properties → select Move and size with cells. |
| Checkbox not clickable | Ensure it’s a Form Control, not an ActiveX Control. |
Final Thoughts
Adding checkboxes in Excel is simple yet powerful. They can transform your basic spreadsheets into dynamic tools for tracking, managing, and automating tasks. Once you’ve mastered linking checkboxes to formulas and conditional formatting, you can build interactive dashboards, task lists, and even mini apps right inside Excel.
The post How to Add a Checkbox in Excel (Step-by-Step Guide) appeared first on free product key.
]]>The post AOMEI Backupper “New Interface” Campaign — Share Your Story & Win appeared first on free product key.
]]>
 What You Can Win
The campaign offers several tiers of rewards depending on how you participate and how many “likes” your shared story receives:
| Prize Type | Reward | Notes / Conditions |
|---|---|---|
| AOMEI Backupper Home License | Free (worth $29.95) | Available directly to participants |
| AOMEI Products Bundle | Full product bundle (worth $409.75) | Includes multiple AOMEI tools |
| Cash Prizes | Up to $200 | For top-liked stories |
Cash Prize Breakdown
- 1st Prize: $200
- 2nd–3rd Prizes: $50 each
- 4th–10th Prizes: $20 each
You visit this giveaway page: https://www.aomeitech.com/partners/aomei-backupper-new-interface-campaign.html
How to Participate
- Share your backup story
- Use text, images, or video formats.
- Share via social media or websites (YouTube, TikTok, Facebook, Twitter, LinkedIn, Instagram, etc.).
- Tag AOMEI’s official account and include the hashtags #AOMEI and #MyBackupStory.
- Submit your link(s)
- Provide your full name and email (for prize notification).
- Submit each share link only once.
- Combined likes across your submissions determine your ranking.
- The campaign ends on October 23.
- Winners announced
- On October 24, winners are revealed on the campaign page.
- Prizes are sent via email.
What’s in the Bundle?
The AOMEI Products Bundle includes lifetime licenses (with upgrade rights) for:
- AOMEI Backupper Professional
- AOMEI Partition Assistant Professional
- AOMEI FastRecovery Professional
- AOMEI FoneBackup Professional
- AOMEI OneKey Recovery Professional
- AOMEI FastRecovery for iOS
Total estimated value: $409.75
Why AOMEI Backupper?
AOMEI emphasizes its long-standing reputation and broad user base:
- Over 186 million users
- Presence in 180+ countries
- More than 300 awards
- 20+ patents
- 16+ years of experience in backup and recovery solutions
The post AOMEI Backupper “New Interface” Campaign — Share Your Story & Win appeared first on free product key.
]]>The post How to Recover Deleted Photos from Micro SD Cards? appeared first on free product key.
]]>In this guide, I will take you through different photo recovery methods to reclaim your lost memories. By masterfully following the steps, you can restore your photos easily.

Is It Possible to Recover Deleted Photos from a Micro SD Card?
Yes! Pictures can indeed be recovered, whether by using manual methods or getting assistance from trustworthy third-party recovery programs, such as RecoveryFox AI. Before you try any of these methods, you should have some basic knowledge of how SD card recovery works.
When you delete photos from a Micro SD card, the photos are not immediately deleted from the memory cards. Once you delete the photos, that memory will be available to be written to again. It is important to note that until new files write over the old memory where the deleted photos remained, they are still recoverable, and this is why you should avoid using the Micro SD card after you lost your data.
Quick Photo Recovery Methods to Retrieve Deleted Photos from a Micro SD Card
Now that you’ve stopped using the Micro SD card, it’s time to recover your lost photos. Below, I’ll discuss different photo recovery methods to help you restore deleted images:
- Method 1: Use Photo Recovery Software to Recover Deleted Photos
When talking about recovering deleted photos – accidentally and permanently deleted – the simplest way to recover your deleted pictures is obviously with professional photo recovery software. RecoveryFox AI is a great recovery photo software for getting your deleted photos back quickly. This all-in-one tool can restore photos lost due to accidental deletion, formatting, virus attacks, and more.
This powerful SD card recovery software performs an AI-powered deep scan of your Micro SD card to retrieve lost images. Some of its standout features include:
- Fast file recovery from formatted SD/TF cards.
- Support for all image formats (JPG, PNG, BMP, ARW, GIF, RAW, etc.).
- Preview option before saving recovered files.
- 98% successful recovery rate.
- Flexibly recover single image files, specific file types, folders containing single files, or all found files.
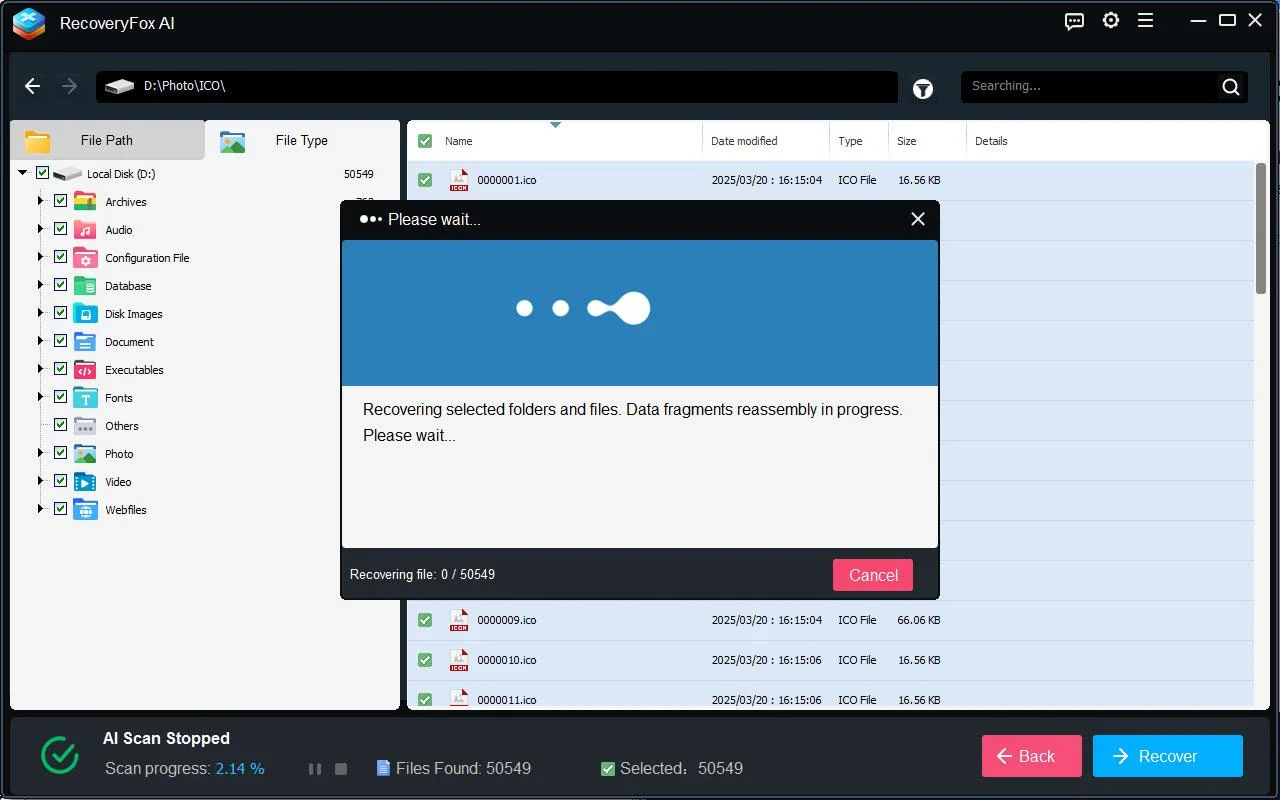
Steps to Recover Deleted Photos Using RecoveryFox AI:
- Download and install RecoveryFox AI on your Windows device. Connect your SD card and launch the software.
- Choose the external hard drive or storage volume that has your deleted files and select Click to Scan.
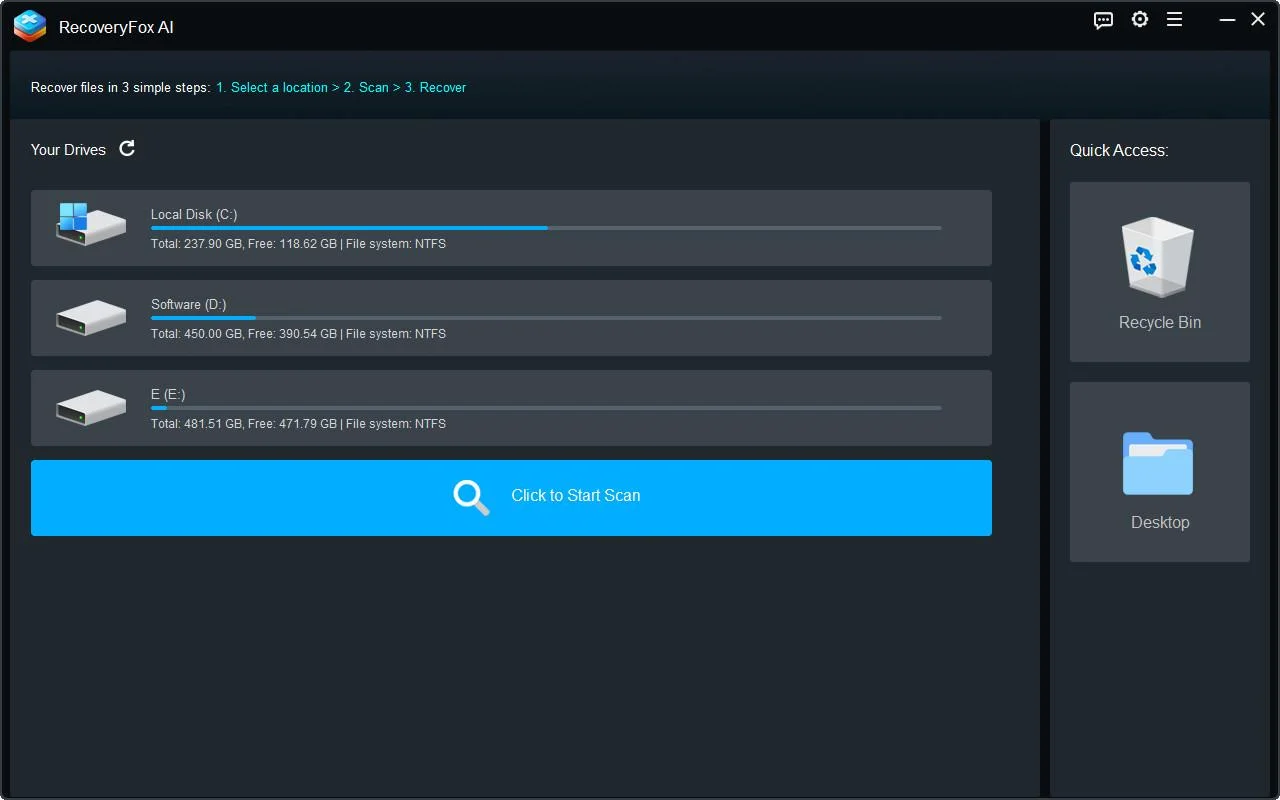
- After the scanning process has been completed, you will preview photos that can be recovered and wherever necessary select those photographs that you would like to recover.
- Press the “Recover” button and save these photos to a safe place.
Method 2: Restore Deleted Photos Using Built-in Backup.
Both the Windows and Mac operating systems have built-in backup options for recovering important files, including deleted photos. The steps are shown below:
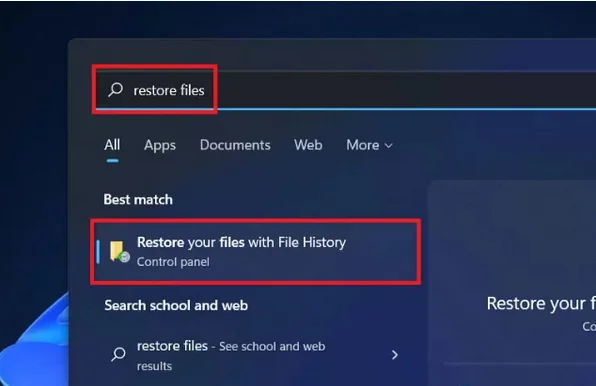
For Windows Users:
- Insert your Micro SD card to your computer using a card reader.
- In the search bar, type in “File History” and select “Restore files with File History”.
- Browse the folder wherever you deleted the photos from, and choose the photos you want to restore.
- Click the green “Restore” button to restore the photos back to your computer.
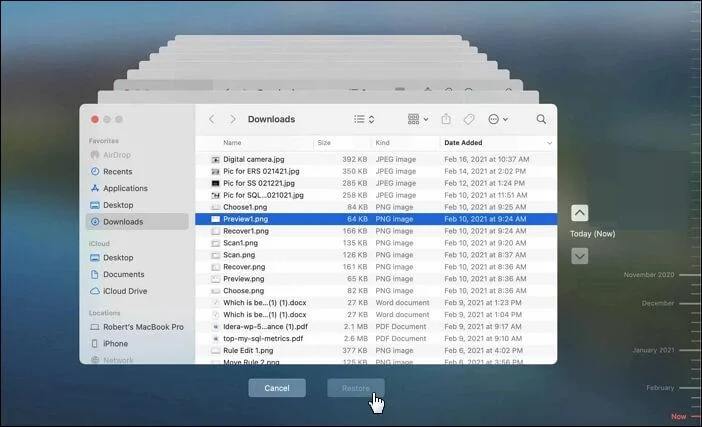
For Mac Users:
1. If you backed up your photos using “Time Machine” you will need to plug your backup drive into the Mac.
2. Open Time Machine and select the date when the photos were on your Mac, select the deleted photos and select “Restore”.
Tips to Avoid Losing Your Photos on Micro SD Cards
Now that you have some way of recovering deleted photos, maybe you should consider some precautions for next time. Here are a few suggestions that will hopefully make sure you won’t have to recover your digital media again:
- Make regular back-ups of your important pictures on another device or using cloud storage.
- Be careful with the media and avoid damaging them physically like bending, dropping, or exposing the card to extreme temperatures.
- Don’t overwrite your media someone as soon as you have had a data loss, stop using the card!
- Make sure the devices you connect to the storage media are reliable.
- Keep your OS, app software, etc. up to date to ensure compatibility.
Conclusion
I trust these data recovery options assist you in quickly getting back your photos on your Micro SD Cards. It is important to act quickly whether you use built-in tools or a professional photo recovery tool like RecoveryFox AI.
FAQs
Q1: Can I recover photos from a formatted Micro SD card?
Yes, you can recover photos from a formatted Micro SD using RecoveryFox AI.
Q2: How long does it take to recover deleted photos?
It depends on the size of the SD Card and the amount of data the recovery is for.
Q3: Can I recover photos from the water-damaged Micro SD Cards?
Sometimes yes, but you might need professional help.
Q4: Are there any free photo recovery software options?
Yes, there is free photo recovery software, but the amount of data recovered could be subject to limitations.
The post How to Recover Deleted Photos from Micro SD Cards? appeared first on free product key.
]]>The post How to Add a Printer to iPhone: A Step-by-Step Guide appeared first on free product key.
]]>
1. Check Printer Compatibility
Before connecting, make sure your printer supports one of these options:
- AirPrint: Apple’s native wireless printing technology. Most modern printers support it.
- Printer Apps: Many manufacturers (HP, Canon, Epson, Brother, etc.) offer companion apps.
- Third-Party Printing Apps: Apps like Printer Pro can also connect unsupported printers.
You can usually find AirPrint compatibility in your printer’s manual or on the manufacturer’s website.
2. Connect iPhone and Printer to the Same Wi-Fi Network
For AirPrint and most apps to work, both your iPhone and the printer must be on the same Wi-Fi network.
- Turn on your printer’s Wi-Fi.
- Connect your iPhone to the same Wi-Fi network via Settings > Wi-Fi.
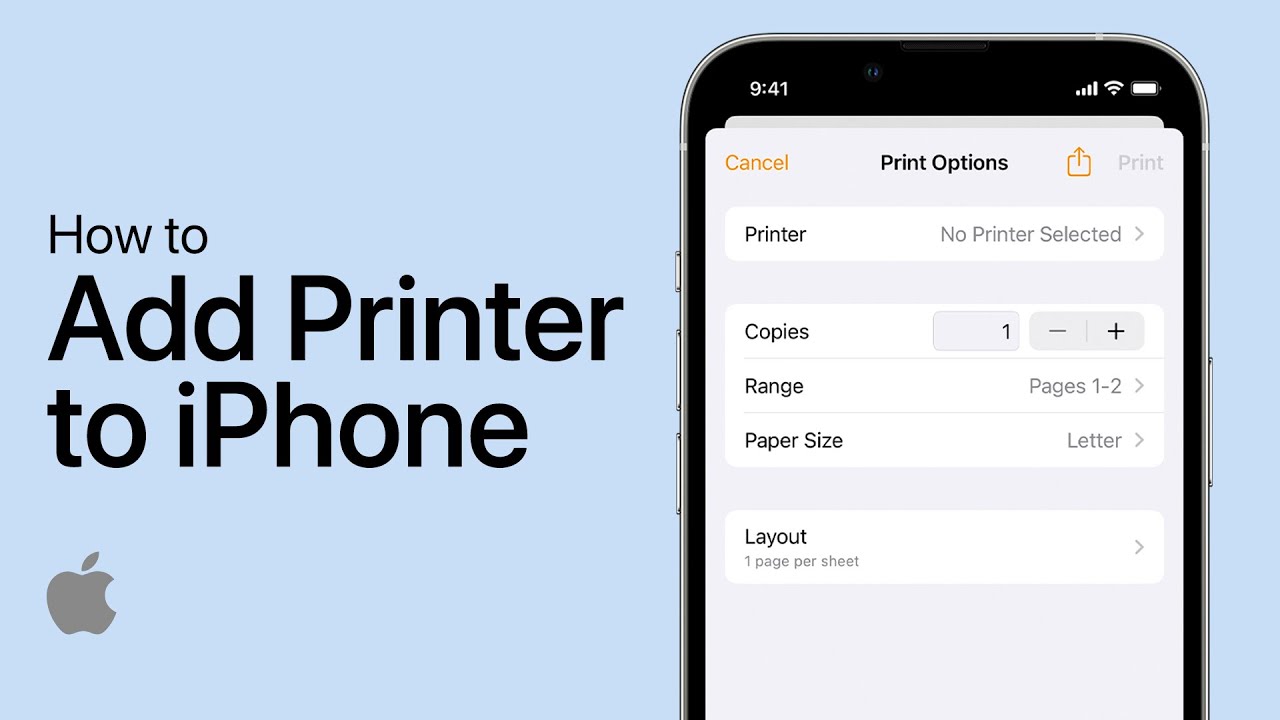
3. Add a Printer Using AirPrint
Here’s how to print directly from your iPhone with AirPrint:
- Open the document, photo, email, or webpage you want to print.
- Tap the Share button (square with an arrow) or the More Options (…) menu.
- Select Print.
- Tap Select Printer and choose your AirPrint-enabled printer.
- Adjust print settings (copies, page range, color, etc.).
- Tap Print in the top-right corner.
That’s it—your iPhone will send the file wirelessly to your printer.
4. Use a Printer’s Official App
If your printer doesn’t support AirPrint:
- Download the manufacturer’s app from the App Store (e.g., HP Smart, Canon PRINT, Epson iPrint).
- Follow the in-app instructions to connect your printer.
- Print documents and photos directly through the app.
5. Use a USB Cable (Optional)
Some printers let you connect directly with a Lightning-to-USB adapter or USB-C adapter (for newer iPhones). This method is less common but works if Wi-Fi isn’t available.
6. Troubleshooting Tips
- Make sure the printer and iPhone are on the same Wi-Fi network.
- Restart both devices if the printer doesn’t appear.
- Update your iPhone’s iOS and your printer’s firmware.
- If AirPrint still doesn’t work, try the printer’s companion app.
Final Thoughts
Adding a printer to your iPhone is straightforward with AirPrint or a printer’s mobile app. Once set up, you can print emails, documents, and photos directly from your device—no computer required. Whether you’re working from home or on the go, printing from your iPhone is a convenient way to stay productive.
The post How to Add a Printer to iPhone: A Step-by-Step Guide appeared first on free product key.
]]>The post What To Do When My Photo Folders Got Corrupt? appeared first on free product key.
]]>But when I tried opening photos from that folder recently, the files wouldn’t open at all. A few had blank thumbnails, and a few others triggered the error ‘The file may be damaged or unsupported.’ All my photos—thousands of them—seemed to be corrupt.
I am sharing my story to help you through a similar situation and explain what you can do if your photos folder gets corrupted.
Step 1: Stop Using the Device
I frantically looked over the Internet to find a solution to repair my corrupt photos.
What I found was a revelation…Stop using the storage drive, where the corrupt photos folder exists. That means don’t move, copy, edit, rename the files, or save anything new in the folder, as overwriting can reduce the chances of successful recovery.
Step 2: Try another USB port and Make Backup of Corrupt Photos
I plugged my drive into another port to rule out any port issues.
Then I made a backup of the entire corrupt photo folder before attempting any recovery steps. Creating backup of corrupt photos might sound odd, but if any file repair method tool messes up with the already corrupt files, then you won’t be able to restore them.
So, better be safe than sorry and prepare a backup of corrupted files before disaster strikes.
Step 3: Try Opening the Photos on Another App
A friend suggested trying to open the photos on another photo-viewing application.
On Mac, I tried opening the images in the Photos app, Preview, and Adobe Photoshop, whereas on Windows, I used Paint, Photos, and Paint 3D. A few photos opened without any error, but most didn’t open at all and threw the error ‘The file is corrupt; please choose another image.’
So, while this step helped recover a small number of photos, it didn’t work for most of them. However, it’s worth trying as a quick check, but don’t expect this will fix all corrupted images.
Step 4: Use Disk Utility or CHKDSK
I’m no tech wizard, but a quick search taught me that sometimes the drive is misbehaving, not the files. File system errors on an external hard drive can prevent files from opening or even make them appear corrupted. So, I used Disk Utility or CHKDSK to check for disk errors.
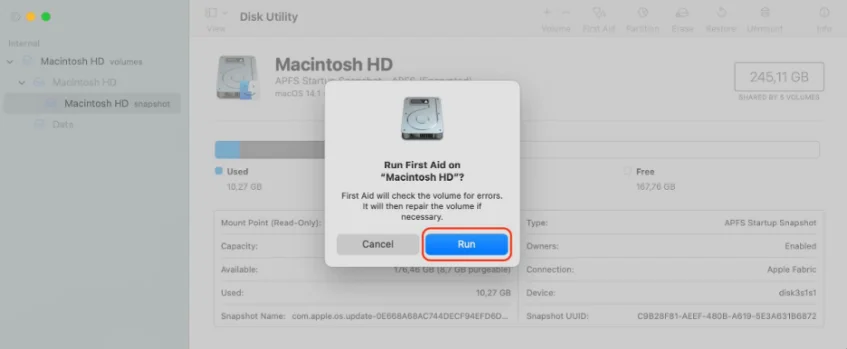
On Mac:
- I opened Disk Utility and selected the external hard drive.
- Clicked on the First Aid tab.
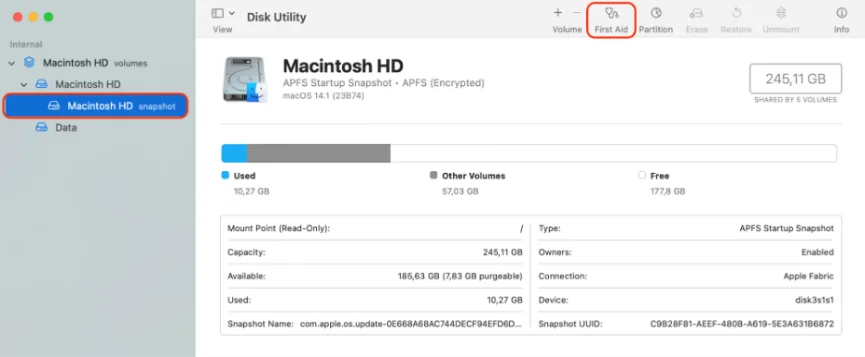
- Clicked on the Run button to run a scan and attempted to fix minor issues on my external hard drive.
On Windows:
- I opened Command Prompt, ran a command: chkdsk D: /f , and then pressed Enter. Replace “D” with your drive letter.
The CHKDSK command fixed some allocation errors, but it didn’t fix the images. However, I learned that the file system isn’t the reason behind the corruption of my photo folder or the photos present in it.
Step 5: Check for Backup
Then, I remembered that some of my trip photos were backed up in my iCloud Photos and Google Photos, so I restored them from there. I even checked my email, WhatsApp, Messenger, and other apps to see if I had shared any of those images there.
So far, I can restore only half of the photos from the corrupted Photo folder.
Step 6: Use Image Repair Tools
Searching for alternatives, I came across Stellar Repair for Photo, a photo repair software that claimed to repair corrupted, broken, or damaged photos saved on an external hard drive. I decided to give it a shot, as there seemed no other way out.
Here’s what I did:
- Download the Stellar Repair for Photo software.
- Connected my external hard drive to my laptop using a USB cable
- Launched the software, click Add File to add corrupted images, and clicked Repair.
- Once done, preview the repaired photo files.
Voila, I found that these were the photos that had gone corrupt, but now they are repaired.
Lessons learned
- Back-Up Smartly
Always store copies of your photos, videos, and other important files in three places: your computer, external SSD, and Cloud backup service.
- Never Interrupt File Transfers
Don’t unplug or shut down your system during the transfer process, as that is when file corruption often occurs.
- Monitor Your Drive’s Health
Run periodic S.M.A.R.T. checks to monitor your drive’s health and detect early signs of hard drive failure.
- Use Antivirus software
Make sure to always run a quick antivirus scan when plugging in the external hard drive or any storage drive, as malware and viruses can silently corrupt the stored files.
In the End
If a folder of precious photos gets corrupted, I know exactly how it feels. But don’t lose hope. A bit of patience, backup, and the right tools should be enough to handle such contingencies and breathe life back into your corrupted photos. And when all else fails, you’ll at least walk away with a lesson—and perhaps a better backup plan.
The post What To Do When My Photo Folders Got Corrupt? appeared first on free product key.
]]>The post How to Add a Signature to a PDF: A Step-by-Step Guide appeared first on free product key.
]]>This guide covers several easy methods—using built-in tools, free apps, and online services—to help you sign PDFs seamlessly.
1. Add a Signature with Adobe Acrobat Reader (Free)
Adobe Acrobat Reader DC is one of the most popular PDF readers, and it includes a built-in signing tool.
Steps:
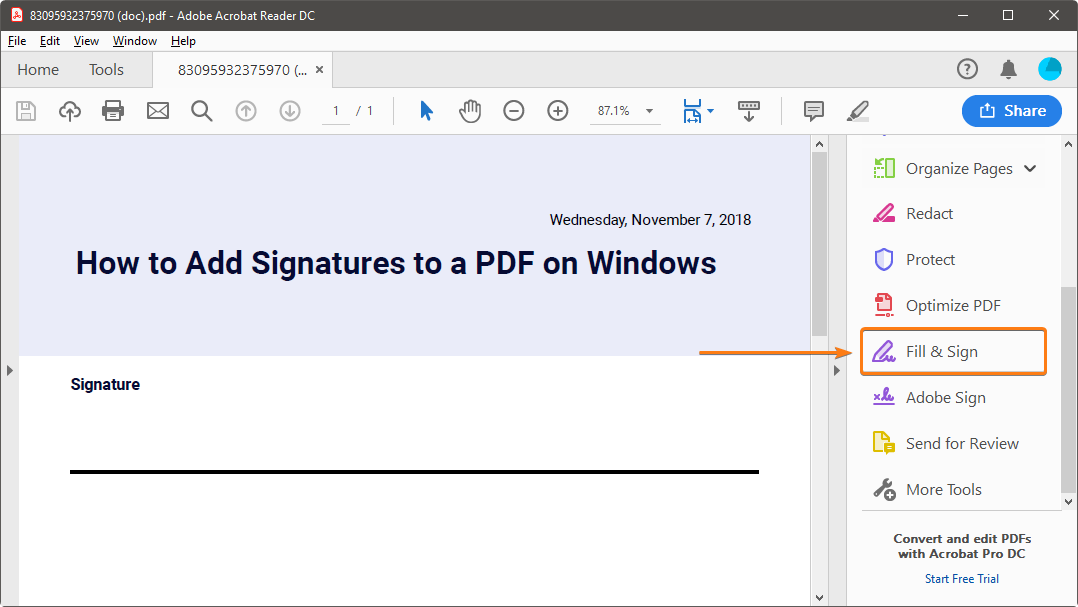
- Open your PDF in Adobe Acrobat Reader.
- Click Fill & Sign in the right-hand panel.
- Select Sign > Add Signature.
- Choose how you want to sign:
- Type: Enter your name, and Acrobat will create a stylized signature.
- Draw: Use your mouse, trackpad, or touchscreen.
- Image: Upload a scanned image of your handwritten signature.
- Place the signature anywhere in the document and save.
2. Sign PDFs on Windows (Microsoft Edge)
Windows 10 and 11 users can sign PDFs without extra software. Microsoft Edge, the default browser, has a built-in PDF signing feature.
Steps:
- Right-click your PDF and choose Open with > Microsoft Edge.
- Click the Draw tool (pen icon).
- Use your mouse or touchscreen to draw your signature.
- Save the signed document.
3. Sign PDFs on Mac (Preview App)
If you’re a Mac user, the Preview app makes signing documents quick and easy.
Steps:
- Open the PDF in Preview.
- Go to Tools > Annotate > Signature > Manage Signatures.
- Create your signature using your trackpad, iPhone, or upload an image.
- Place the signature in the desired spot and save the file.
4. Use Online PDF Signing Tools
If you don’t want to install software, online PDF signing services can help. Popular platforms include DocuSign, Smallpdf, and HelloSign.
Steps (example with Smallpdf):
- Go to smallpdf.com/sign-pdf
- Upload your PDF.
- Choose to Draw, Type, or Upload your signature.
- Insert your signature and download the signed PDF.
(Tip: Be cautious with sensitive documents—only use reputable online services.)
5. Sign PDFs on Mobile Devices
Most mobile devices allow PDF signing directly.
- iPhone/iPad (iOS Mail app): Open the PDF, tap the markup icon, and add a signature.
- Android: Use Google Drive or apps like Adobe Fill & Sign.
Final Thoughts
Adding a signature to a PDF is no longer a hassle—you don’t need a printer or scanner. Whether you use Adobe Acrobat Reader, built-in system apps, or online services, the process is quick and efficient.
For sensitive legal or financial documents, always choose trusted apps or software to keep your data secure.
The post How to Add a Signature to a PDF: A Step-by-Step Guide appeared first on free product key.
]]>The post How to Add a Checkbox in Microsoft Word appeared first on free product key.
]]>Method 1: Add a Printable Checkbox (for paper checklists)
This method is ideal if you’re creating a document meant to be printed and filled out by hand.
Steps:
1. Open Word and place your cursor where you want the checkbox.
2. Go to the Home tab.
3. In the Paragraph section, click the small arrow next to the bullet points icon.
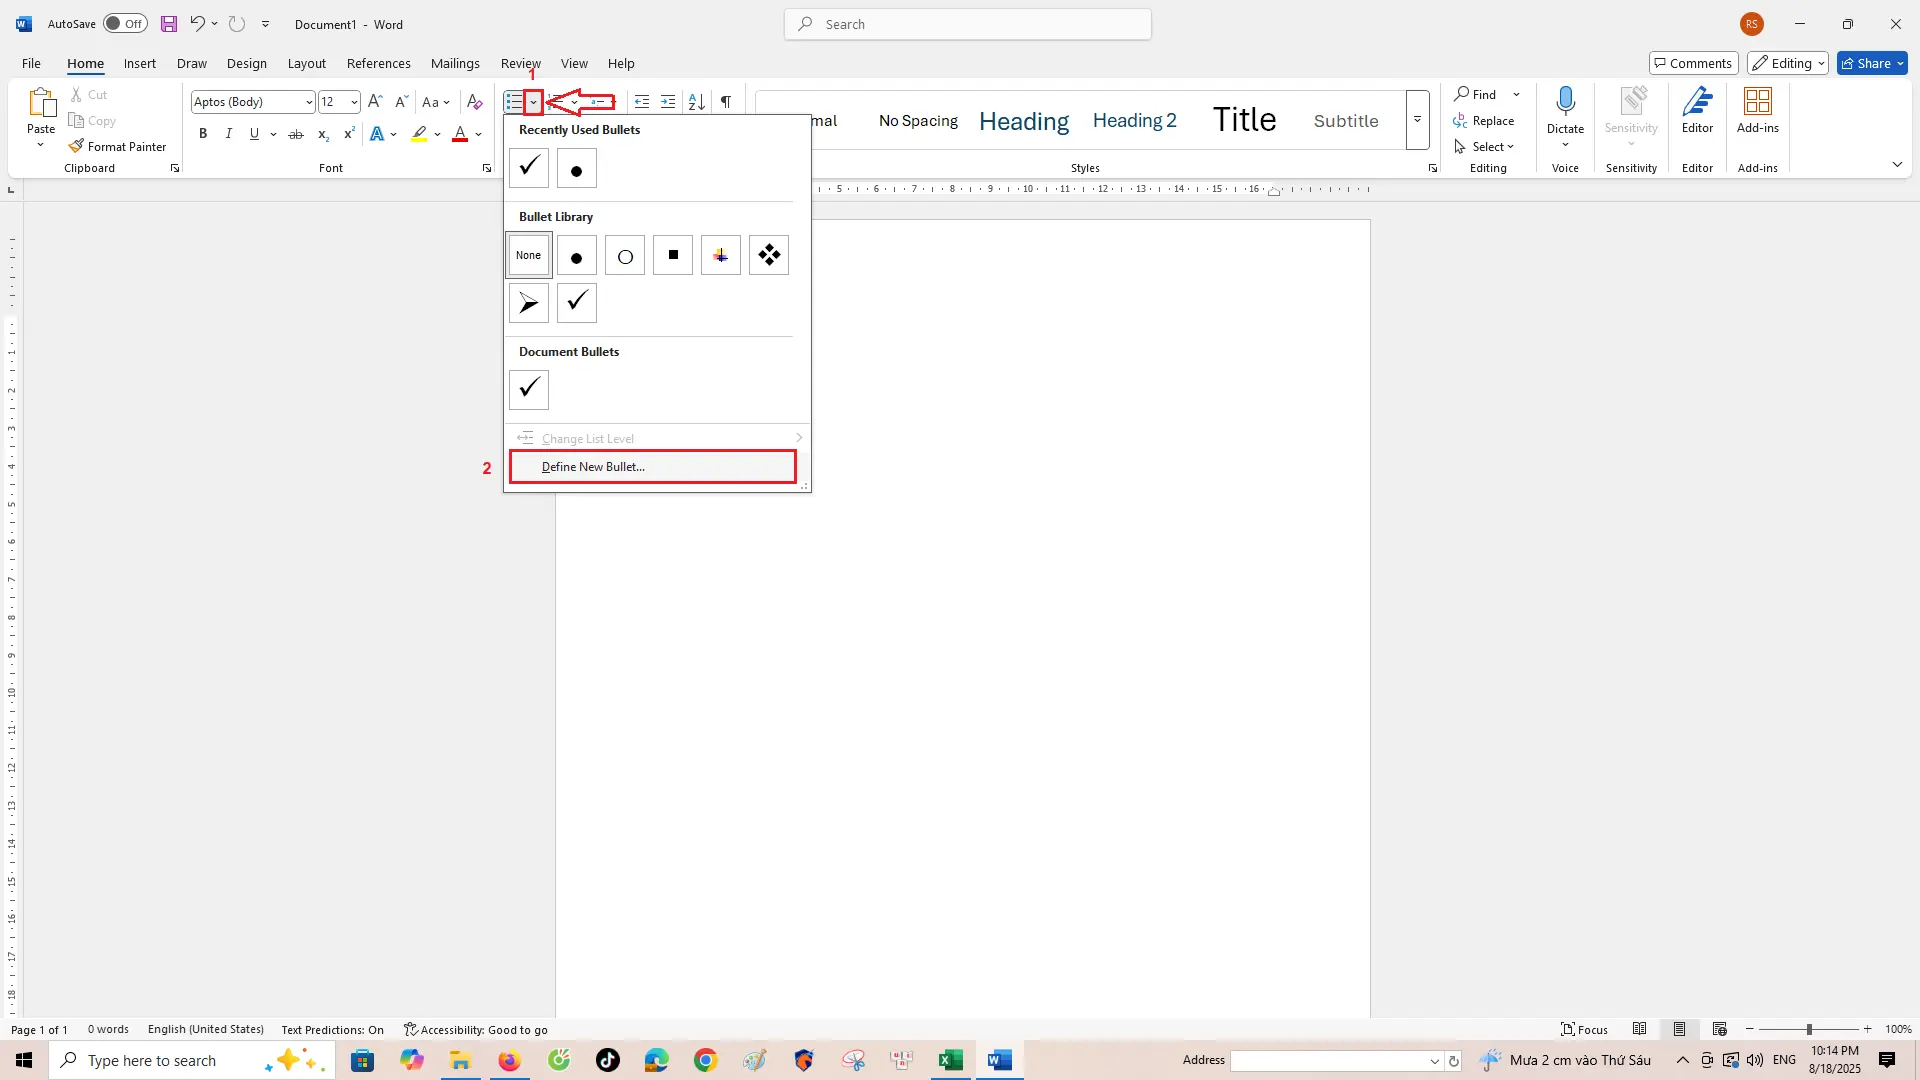
4. Choose Define New Bullet.
5. Click Symbol.
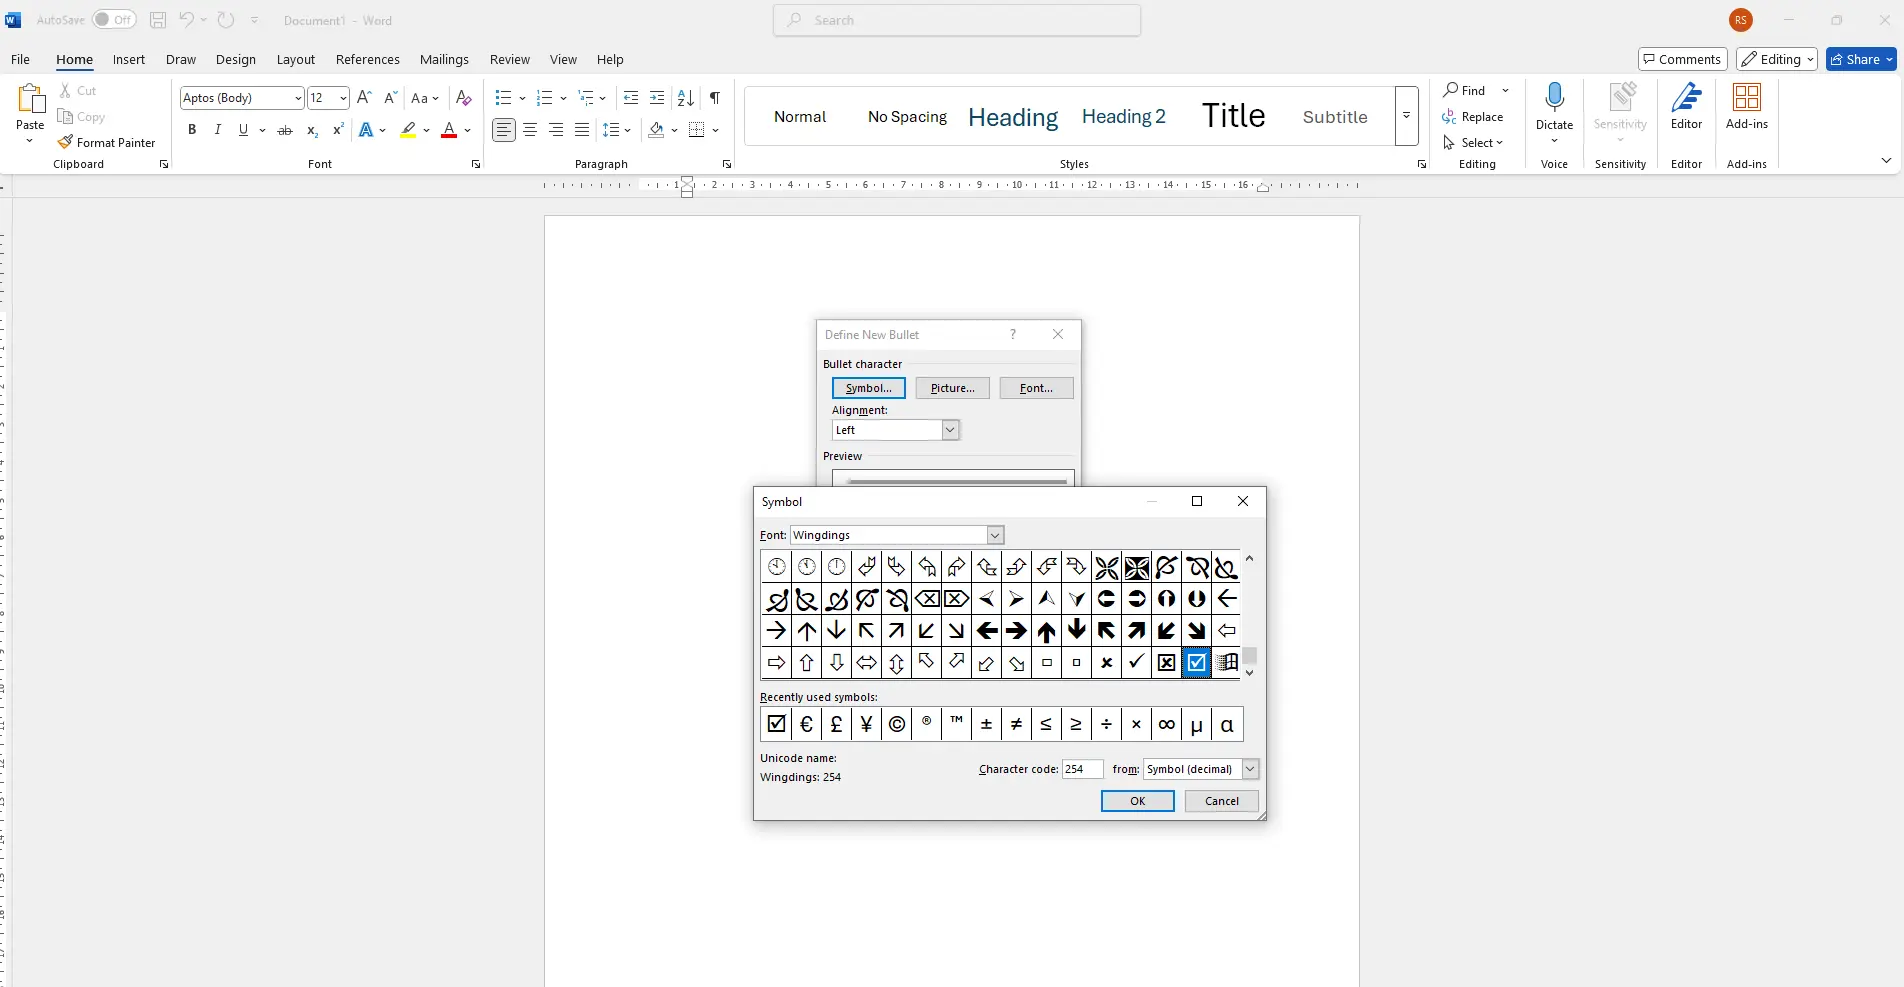
6. In the dialog box, set the font to Wingdings.
7. Select a checkbox symbol (✓ or ☐) and click OK.
Your checkbox will now appear as a bullet point. Press Enter to create more checkboxes.
Method 2: Add a Clickable Checkbox (for interactive forms)
This method adds checkboxes that users can click to check/uncheck — perfect for digital forms.
Steps:
- Go to the File tab and click Options.
- Select Customize Ribbon.
- On the right pane, check the box for Developer tab and click OK.
- Now go to the Developer tab in the ribbon.
- Click on the Check Box Content Control () icon to insert a clickable checkbox.
Each time you click the icon, it will insert a new interactive checkbox at the cursor’s location.
Optional: Protect the Document for Form Use
To prevent accidental editing of other parts of the document while allowing checkbox interaction:
- Go to the Developer tab.
- Click Restrict Editing.
- Under Editing restrictions, check Allow only this type of editing in the document, and select Filling in forms.
- Click Yes, Start Enforcing Protection, and optionally set a password.
Conclusion
Adding checkboxes in Word is easy and helps improve the usability of your documents. Choose a printable or clickable checkbox depending on your needs. Once set up, you can save your document as a template to reuse in the future.
The post How to Add a Checkbox in Microsoft Word appeared first on free product key.
]]>The post Smart Holiday Travel Hacks Every Traveler Should Know appeared first on free product key.
]]>
Pack Like a Pro Without Overpacking
Start by picking versatile clothes. Neutral colors and lightweight layers allow for multiple outfit combinations. Rolling clothes instead of folding them can save space and reduce wrinkles. Packing cubes help keep everything organized and make unpacking easier. They also make it simpler to spot what’s clean and what’s not.
Bring a small laundry bag or even a large ziplock to separate dirty clothes during your trip. This avoids mixing clean garments with used ones and keeps things hygienic. Always check the weather at your destination and pack accordingly, but keep an emergency layer or compact raincoat in your bag just in case.
Master the Art of Booking Flights
Timing can significantly affect airfare. Booking flights on a Tuesday or Wednesday tends to yield better prices, especially for midweek travel. Use fare comparison tools and set alerts to track price drops. Consider flying into nearby airports if it saves money or time.
Red-eye flights or early-morning departures might be less desirable, but they often come at a lower cost and have fewer delays. Try to avoid traveling during major rush hours at airports, especially the day before big holidays when terminals are busiest.
Stay Ahead with Smart Tech Choices
Bringing the right technology can make holiday travel much easier. Portable chargers are essential, especially during long transit days. Travel adapters are crucial if visiting a country with different power outlets. A digital luggage scale prevents overweight bag fees.
One clever tool that’s becoming increasingly popular is the eSIM card. It allows travelers to access local mobile data without the hassle of swapping physical SIM cards. Just download and activate it, and you’re ready to connect. It’s a helpful option for those visiting multiple countries or needing steady access to maps and translation apps.
Choose the Right Accommodation
When choosing a place to stay, consider both comfort and location. Staying close to major attractions or public transport hubs can save time and commuting costs. Read reviews carefully, especially comments about cleanliness, noise levels, and customer service.
Booking platforms often offer filters that help narrow down searches by price, amenities, or proximity. If staying for more than a few days, a place with a kitchen or laundry facilities can save money and add convenience. Always confirm the details before booking to avoid surprises.
Use Travel Apps to Stay Organized
There are apps for nearly every part of the travel experience. Flight tracking apps provide updates on delays or gate changes. Currency converters make it simple to understand how much you’re really spending abroad. Note-taking apps help organize bookings and itineraries in one place.
Language apps with offline access can be lifesavers when dealing with language barriers. Food review apps can help discover hidden dining gems that locals recommend. These digital helpers reduce stress and keep the trip flowing smoothly.
Be Prepared for the Unexpected
Always have a plan B. Delays, cancellations, or lost reservations can happen without warning. Keep digital copies of travel documents and ID. A small stash of emergency cash in local currency can be useful when cards don’t work or ATMs are scarce.
Pack a mini first aid kit with bandages, pain relievers, and basic medicine. Include items like lip balm, tissues, and disinfectant wipes, which often come in handy. Being ready for small inconveniences can prevent them from becoming major disruptions.
Stay Connected without the Headache
Mobile data can be costly when traveling abroad. Avoid sky-high roaming fees by using an eSIM card. It eliminates the need to hunt for local SIM vendors upon arrival and provides immediate access to data.
Having steady internet access helps with everything from navigation to translating street signs. It also allows for easy communication with friends and family back home. Make sure the device is compatible with the digital SIM card before purchasing.
Eat Like a Local, Not Just a Tourist
Exploring local cuisine is one of the best parts of traveling. Skip international chains and try small eateries or street food stalls with high local traffic. They’re often more authentic and budget-friendly. Ask hotel staff or drivers for food recommendations; they usually know the best spots.
Food markets are also great places to sample a variety of local flavors. Trying unfamiliar dishes can be part of the adventure, just be cautious with street food hygiene. Bring digestive aids if prone to stomach issues.Traveling smart doesn’t require a huge budget or complicated planning. It’s about being intentional, using the right tools, and preparing for the details that matter. From packing strategies to tech upgrades like an eSIM card, these small choices can lead to a smoother, more enjoyable holiday experience. So, pack wisely, stay flexible, and make the most of every moment on the journey.
The post Smart Holiday Travel Hacks Every Traveler Should Know appeared first on free product key.
]]>The post How to Add a Line in Word appeared first on free product key.
]]>How to Add a Line in Word
1. Using Keyboard Shortcuts (AutoFormat)
Microsoft Word has built-in shortcuts to automatically create horizontal lines.
How to Do It:
- Place the cursor where you want the line.
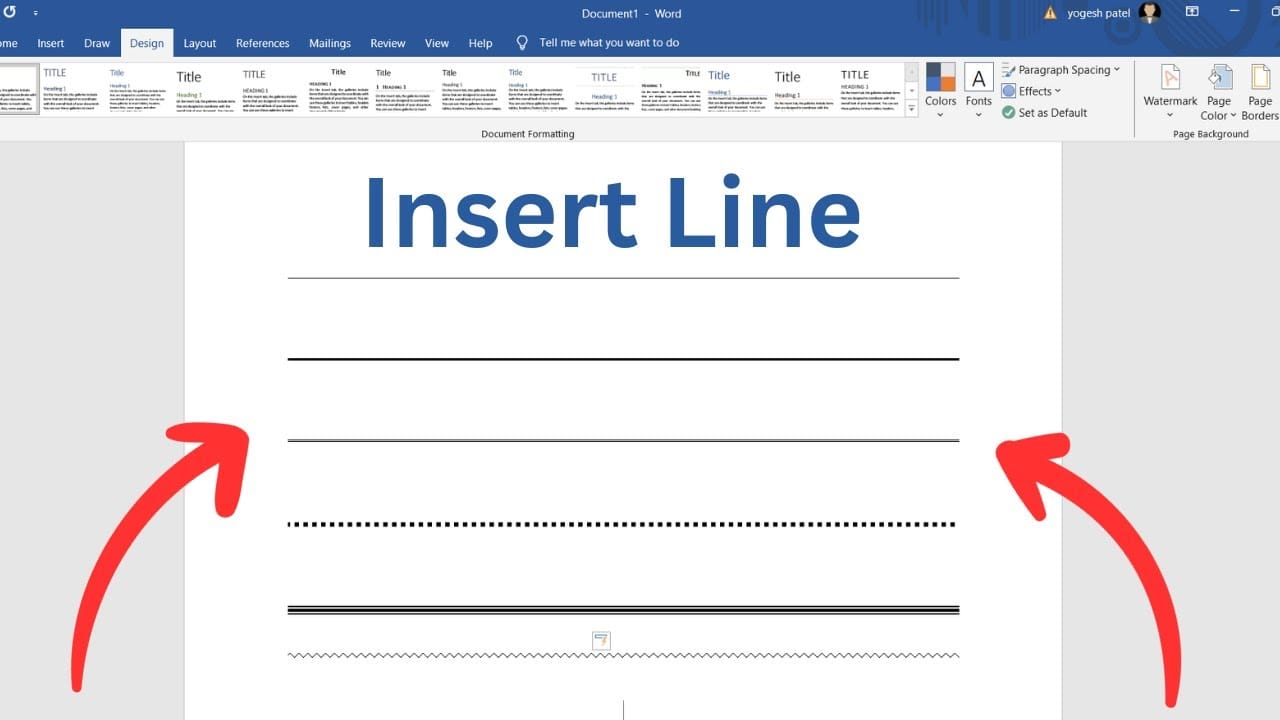
- Type one of the following characters three times, then press Enter:
---(three hyphens) = thin single line===(three equal signs) = thick single line___(three underscores) = bold line***(three asterisks) = dotted line###(three number signs) = triple line with thick center
Note:
If AutoFormat is disabled, you may need to enable it:
- Go to File > Options > Proofing > AutoCorrect Options > AutoFormat As You Type.
- Check Border lines.
2. Using the Borders Tool
You can also add a line using the Borders feature.
How to Do It:
- Select the paragraph where you want the line to appear below.
- Go to the Home tab.
- In the Paragraph group, click the Borders icon (a square with a four-pane border).
- Choose Bottom Border (or another option like Top Border or All Borders).
This adds a line across the width of the page or paragraph.
3. Inserting a Shape (Line Tool)
For more control over the line’s appearance or position, use the Shapes tool.
Steps:
- Go to the Insert tab.
- Click Shapes, then choose the Line.
- Click and drag on the page to draw the line.
- Use the Format tab to adjust line style, color, and thickness.
This method is useful for custom designs or if you want the line at an exact location.
4. Using the Horizontal Line Option
Word has a built-in horizontal line feature.
How to Use It:
- Go to the Home tab.
- In the Paragraph group, click the Borders dropdown arrow.
- Select Horizontal Line.
This inserts a standard horizontal rule that you can format by right-clicking and selecting Format Horizontal Line.
Tips for Customizing Lines
- You can change the color, style, and alignment of lines created with shapes or the horizontal line feature.
- If the line is too close to other text, adjust paragraph spacing.
- Hold Shift while drawing a line to keep it perfectly horizontal or vertical.
Conclusion
Whether you want a quick divider or a precisely placed graphic element, Microsoft Word offers multiple ways to add lines. From simple shortcuts to customizable shapes, you can enhance your document’s readability and appearance with just a few clicks.
The post How to Add a Line in Word appeared first on free product key.
]]>


